This is the ultimate guide for beginners and intermediates to learn piano. This guide teaches you how to play the piano from the very basics to advanced music concepts. This Guide is divided into 7 Parts starting with Introduction to Piano and then moving on the concepts like Hand Positions, Reading Music, Scales, Chords and creating a practice program to master the instrument.
Table of Contents
- Piano – The Instrument
- Choosing the Right Piano
- Hand Position & Sitting Posture
- How to Read Piano Music?
- Letter Notations
- Sheet Music
- Fundamentals of a Piano Music
- Scales
- Chords
- Using a Metronome
- Practice Program
- 3 Month Guide to Master Piano
- Beginner Friendly Songs List
- Tips for Further Learning
Part 1: Piano – The Instrument
Congratulations on choosing to learn the piano!
What was it that brought you to this instrument? Perhaps it was its versatility; you’ll hear the piano across countless musical styles including classical, jazz, pop and rock. Or maybe it was the amazing repertoire written for the instrument. Piano pieces such as Beethoven’s Fur Elise and Moonlight Sonata are among the most recognizable classical works in the world!
If you have never played a musical instrument before, the piano is the perfect place to start. Unlike almost every other instrument, the piano is very visual, with the keys laid out in front of the performer. Playing the piano also doesn’t require finding the notes by ear, as string instruments do, meaning it can be played without any prior musical knowledge. A beginner’s keyboard can also be purchased relatively cheaply, making it the perfect place to begin your musical journey.
Taking the first steps
Let’s take a look at few exercises to get started in piano playing. You can try these on either a keyboard or piano. (Refer to part two for more information on the different type of pianos available.)
Starting anything new can be daunting, so these easy exercises can be a great way to introduce yourself to your instrument!
Finding high and low sounds
Using your left hand, play a few notes on the left-hand side of your piano. (Use any fingers and don’t worry about the shape of your hand- we’ll get to that soon!) Listen to the sound. How would you describe it? High or low?
Now switch hands and play a few notes at the right-hand side of the piano. How do these notes sound?
To produce a low sound, we play the notes on the left-hand side of the piano, with the pitch getting higher as you move to the right. Start from the lowest note and play each key until you reach the top of the piano, listening to the change in sound as you move higher up the keyboard. Then reverse it and play the notes from highest to lowest.
Black and white notes
Take a close look at the way the notes of the piano are arranged. Notice how the black notes are grouped in two, then in three, then in two, then three and so forth.
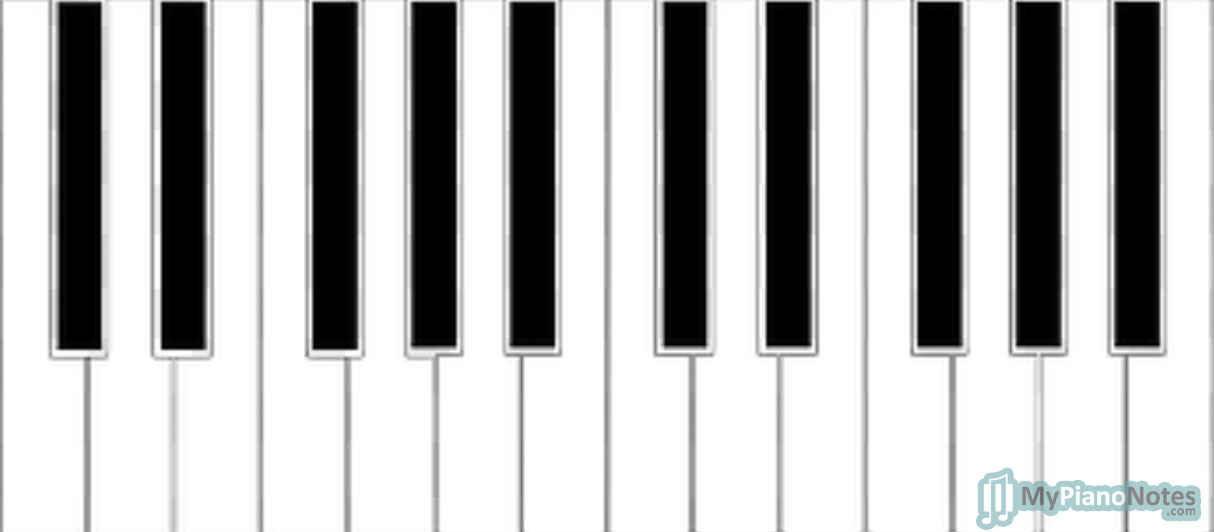
Because the piano is such a visual instrument, we use this arrangement of black keys to locate each note. (More about that later!) For now, work your way up the keyboard finding all the groups of two black notes. Then, turn around and come down the piano, playing all the groups of three black notes.
Improvisation
Possibly the best way to get comfortable with your instrument is to try improvising! This means making up a song on the spot. Don’t worry, it’s not as daunting as it sounds! You’re making up your own song, after all, so you can’t possibly get in wrong!
Try playing one note at a time, then try more than one. (We call this playing a chord.) Experiment playing on the white keys, then the black. Which sound do you prefer?
Relax and enjoy experimenting with the different sounds on the piano. Try not to let your critical mind get in the way- this exercise is all about exploring the instrument and it doesn’t matter if you like the way it sounds or not!
Take note of your discoveries and have fun!
Part 2: Choosing the Right Piano
Grand piano, upright piano, digital piano, electric keyboard… With so many options out there, choosing the right piano can be daunting. It is important to choose something that’s comfortable to you and within your budget, so that you can learn piano without spending a fortune. So, let’s take a look at the choices to determine which is the best for you!
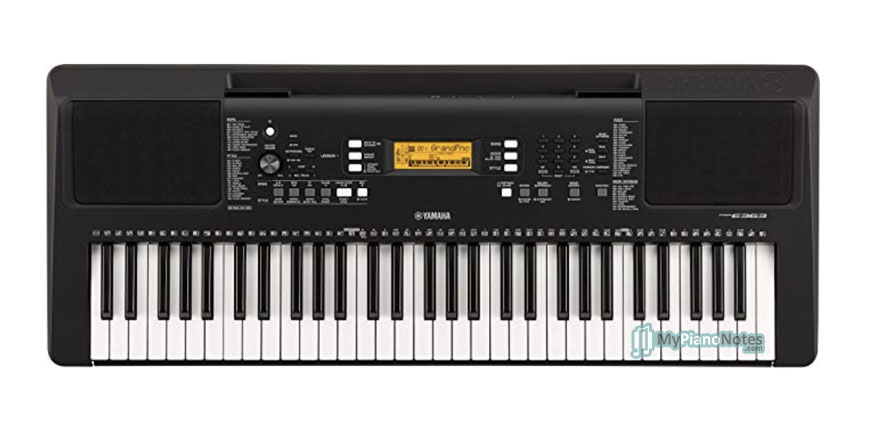
Electric Keyboards
The simplest way to begin learning the piano is to start with an electric keyboard. These are small and portable and far cheaper than full-sized acoustic pianos. Keyboards usually come with a detachable music stand, however, you will need to purchase a keyboard stand and pedal separately. (While it may be tempting to just put the keyboard on a table, playing with the instrument at the wrong height can lead to problems in posture and technique. See part four for more details.)
Many electric keyboards come with a variety of programmed voices and backing rhythms. These can be great for students beginning to explore and be inspired by music. You will find, however, that the sound produced by these instruments does not match the quality and authenticity of acoustic pianos.
The keys of an electric keyboard are plastic and unweighted, meaning they feel very different to those of an acoustic piano. Playing unweighted keys has both pros and cons. The positive side is that it requires less effort to push the keys down, making it easier to concentrate on technique and hand position. This can be particular beneficial for young children with smaller, weaker hands. The down side is that learning on unweighted keys can make it difficult to transition onto an acoustic piano as it requires a different amount of finger control.
Most electric keyboards contain only five octaves (a modern acoustic piano contains seven), meaning only limited repertoire can be played on this instrument.
While an electric keyboard can be a great place to start, it is recommended that students serious about learning the piano transition to a full-sized instrument within a year.
- Top brands: Yamaha, Casio
- Cost: Lesser known brands can be purchased new from approximately $50. Top brands range between $100-$300. It is also very easy to find second-hand keyboards.
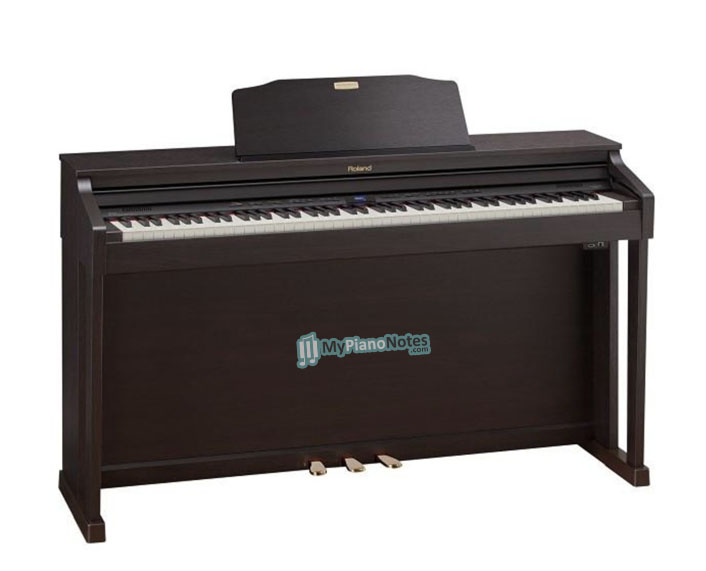
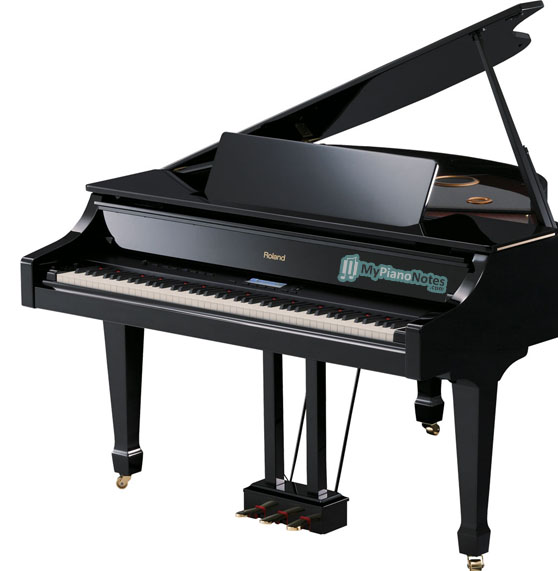
Digital Pianos
If you are looking for a full-sized instrument but are not ready to commit to an upright piano, a digital piano can be a good option.
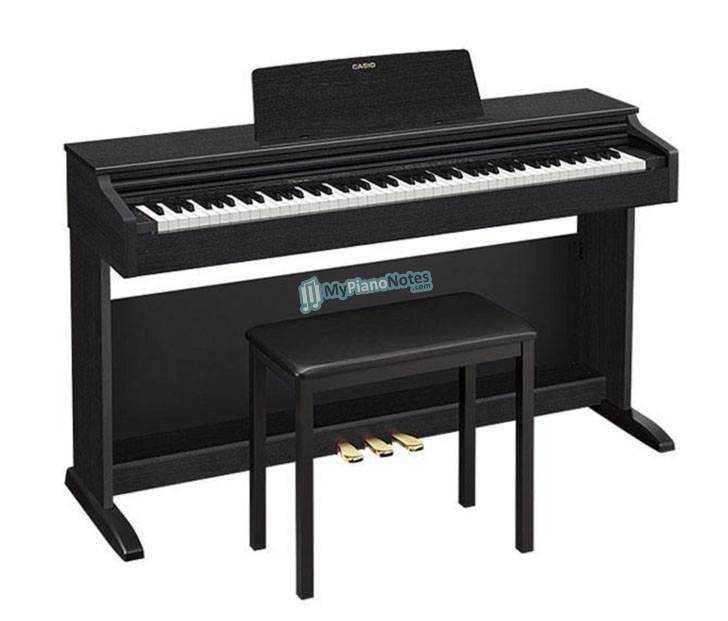
Digital pianos usually consist of the full seven octaves and the keys are generally weighed, making them a much closer replica to an acoustic piano. They can be purchased with either a separate stand and pedal, or with everything built in— a sturdier but more expensive option.
Digital pianos are generally cheaper than acoustic uprights and take up less space. Their sound quality is usually far superior to that of an electric keyboard, but still lacks the authenticity of an acoustic instrument.
They can be a great option if you have outgrown an electric keyboard but are not ready to commit to a large and more expensive acoustic instrument. Parents who want their kids to learn piano with a little more sincerity choose to invest in this.
- Top brands: Yamaha, Casio, Kawai, Roland
- Cost: Prices for a new digital piano range from approximately $300 for a full-sized digital piano without a stand to upwards of $2000 for an instrument with stand and pedals.
Upright Pianos
For anyone serious about playing the piano, it is hard to look past the authenticity of an acoustic piano. This instrument’s most common- and most accessible- form is the upright piano, so called because its strings stand vertically. (Open the lid of an upright piano and take a look inside at the incredibly complex workings of the instrument!)
While these are bigger and generally more expensive than their electronic counterparts, upright pianos produce a richer, more authentic sound and a greater range of tone and volume. Unlike digital pianos however, acoustic instruments require tuning which can be costly. Finding a suitable place in the home for the piano can also be a challenge– it is recommended to keep pianos against the outside walls of the house as the changes in temperature can affect the tuning.
People who don’t even want to learn piano, often buy an upright piano as it dresses up the living room and houses in a very elegant way.
There are countless different brands of upright pianos, each producing their own distinct sound. This is due to elements such as the tension in the strings and the surface and condition of the hammers. As a generalization, brands like Yamaha and Kawai will produce a sharp, bright sound, while pianos produced by companies such as Steinway & Sons and Bluthner will sound more mellow.
- Top Brands: Steinway & Sons, Bosendorfer, Kawai, Stuart and Sons
- Cost: A new upright piano begins at approximately $3000. It is possible to pay upwards of $20,000 for a new, top of the range instrument.
Grand Pianos
Watch any piano performance in a concert hall and the performer will no doubt be playing a grand piano. These are large, acoustic instruments that produce a rich and resonant sound.
While it is unlikely that a beginner student will seek out a grand piano as their first instrument, no guide to pianos would be complete without looking at the instruments at the very top of the range!
These instruments are of varying size, ranging from 4 feet (1.2m) to an enormous 8 feet (2.4m)! The bigger the piano, the longer the strings, and subsequently, the richer the sound.
- Top brands: Steinway & Sons, Bosendorfer, Kawai, Fazioli
- Cost: For the smallest grand piano, you can expect to pay around $13,000 with top quality concert grand pianos going for anything up to $170,000!
Shopping for an instrument
In today’s digital age, it is tempting to buy a piano or keyboard online. While simply clicking a button is undoubtedly the easy option, it is highly recommended that you choose a piano by shopping in person.
Piano sales staff are generally highly trained musicians able to give you detailed advice and suggestions regarding each specific instrument. Particularly if you are new to the piano, such expert advice can be invaluable.
Secondly, shopping in person will give you a chance to play each instrument before you buy. Each piano, whether digital or acoustic will have a slightly different sound and feel and it is important to choose an instrument that is both comfortable and enjoyable for your own particular tastes.
Buying Used Pianos
Given the price of new pianos, it can be tempting to seek out a second-hand instrument. While this is definitely a viable option, it does come with a word of caution. Acoustic pianos, particularly those made by lower quality brands can depreciate quickly and may be prone to breakages and tuning problems. A great way to find a good quality, affordable second-hand piano is to use a reputable piano restorer, who will be able to advise you on the qualities and challenges of each instrument.
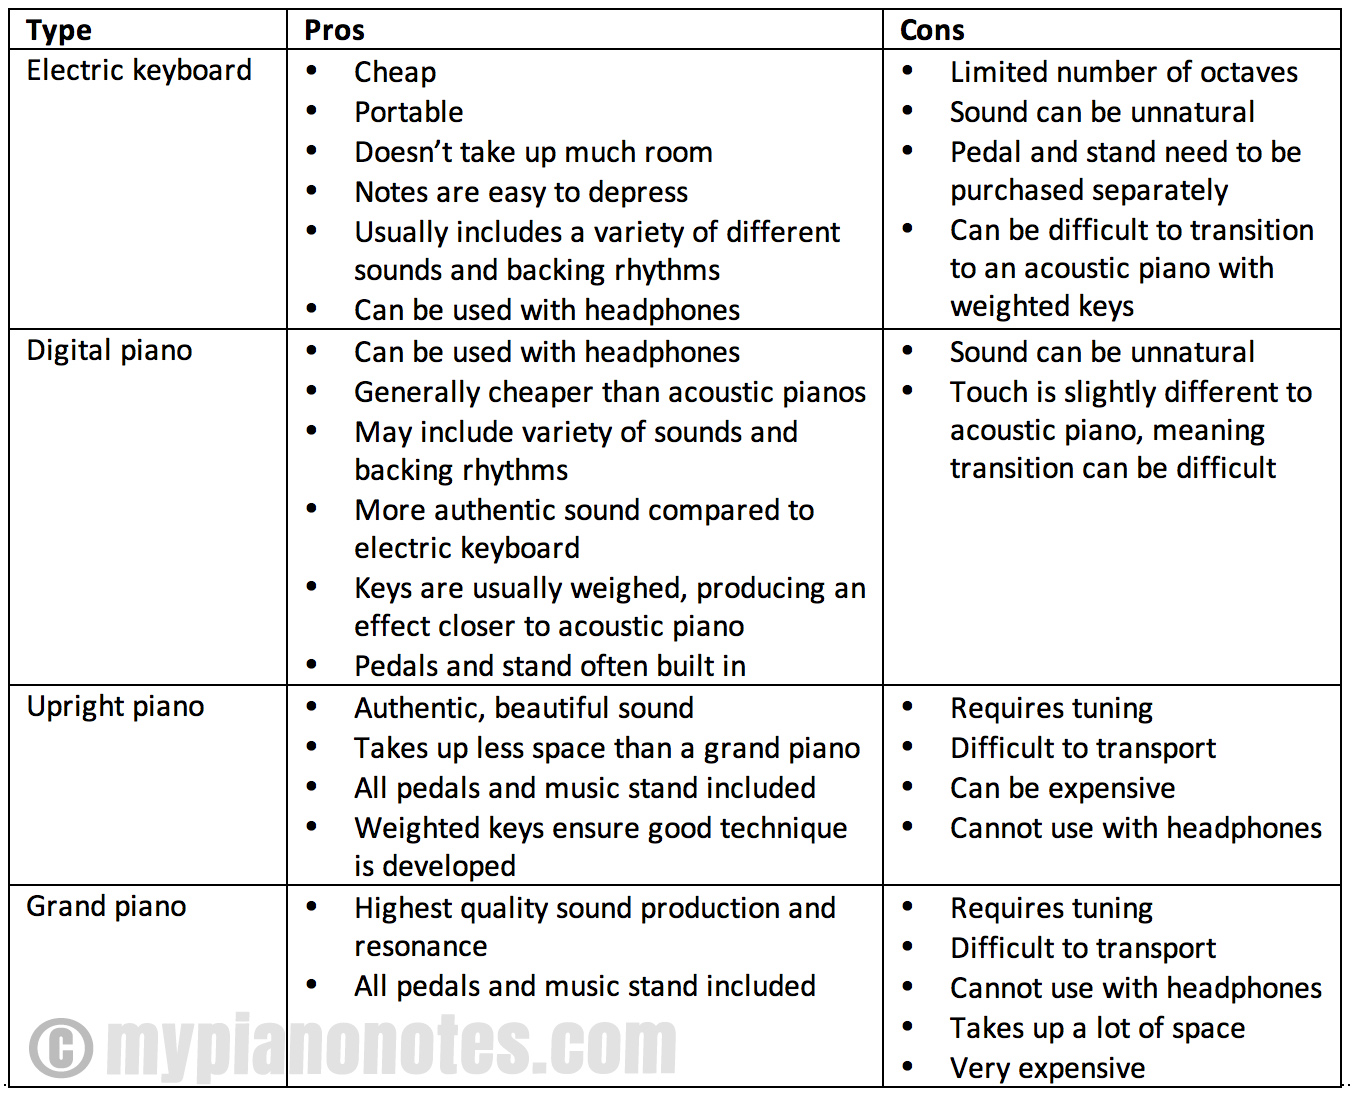
A Quick Guide
Here’s a handy table summarizing all of the above. Use it to weigh up the options and decide which piano is right for you.
Part 3: Hand Position and Sitting Posture
Now you’ve chosen your piano, it’s important to spend a little time ensuring your posture and hand position are correct. It’s much easier to do this now than to try and fix bad habits later on!
Stool and keyboard placement
As mentioned in the previous part, make sure you are using a proper piano stool. The standard stool height is 19-20 inches (50 cm) and while it is possible to find stools with adjustable heights, keeping to the standard measurements is a good place to start.
If you are playing a keyboard rather than a piano, adjust your stand so the keys are approximately 28 inches (71cm) from the floor. This is the standard height of a piano.
Make sure the piano stool is squarely facing the keyboard.
Sitting position
Now your keyboard and bench are at the correct height, take a seat facing the keys. Ensure your arms and shoulders are relaxed. (It can be useful to swing the arms a few times before playing to loosen the muscles.) Now bring your hands to the keyboard. Don’t worry about your hand shape- we’ll get to that shortly! Adjust your stool forwards or backwards until you can comfortably reach the keys while keeping the elbows in front of the body. Many beginners find it tempting to sit close to the keys, but by sitting further back, you allow the arms more freedom and ease of movement. It’s also much easier to take in the whole keyboard from this distance, making it easier to jump to different octaves and hand positions. While this is not such a concern when beginning to play, remember, it’s much easier to get into good habits right from the beginning!
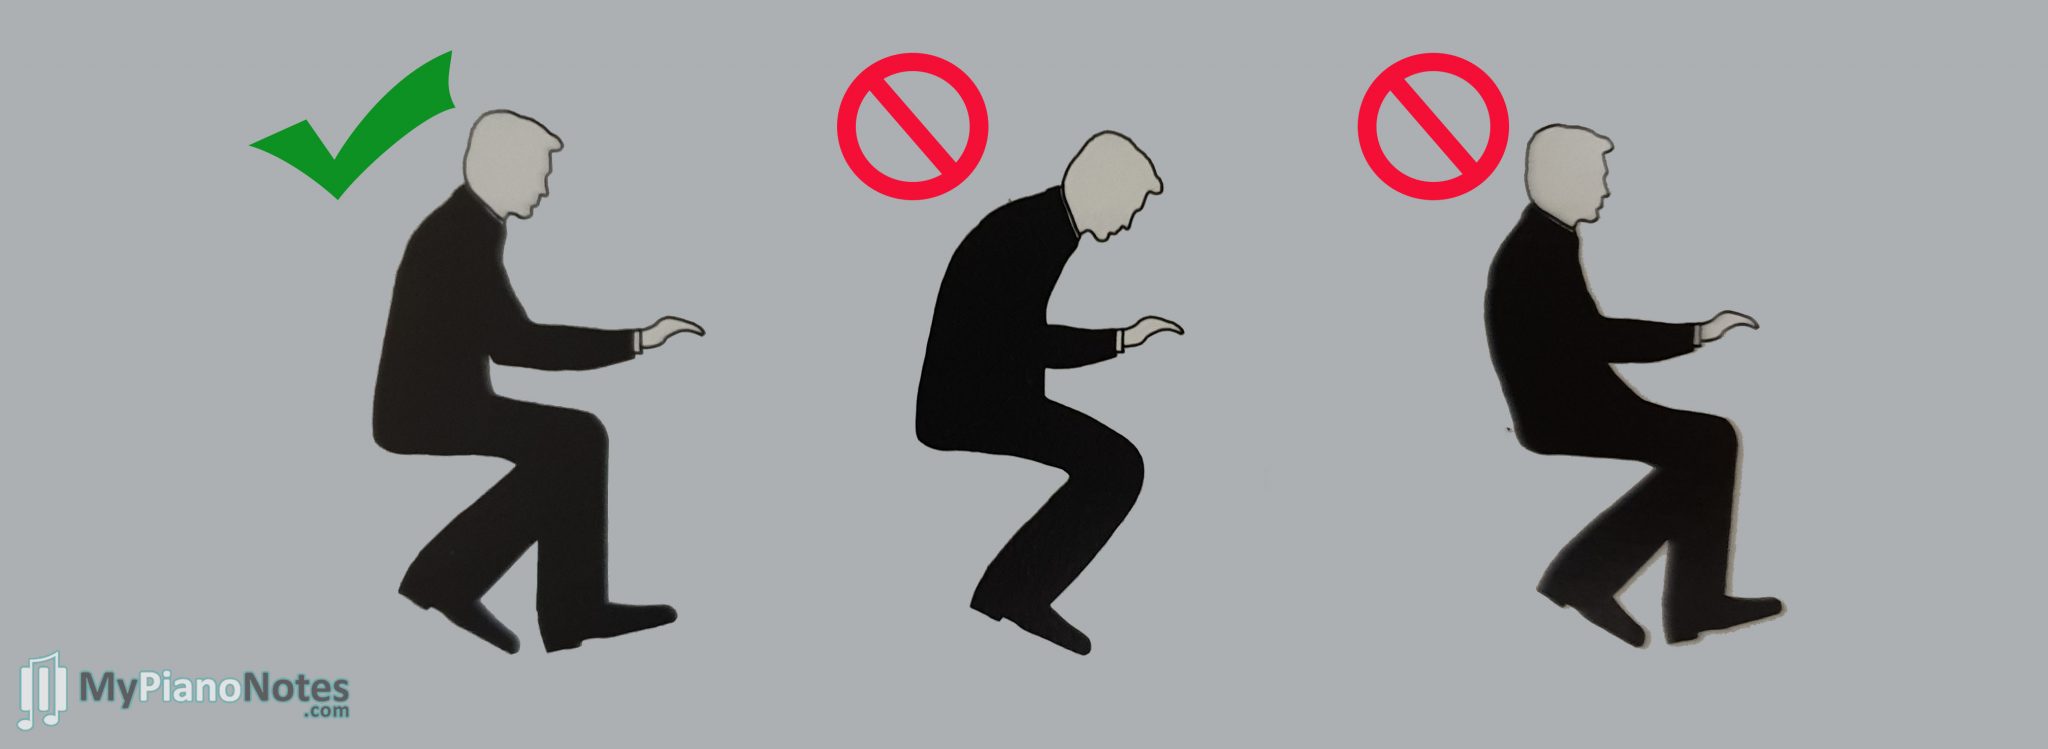
Keep your feet flat on the floor. (Later, we will use the feet to reach the pedals, but get into the habit of keeping them still for now.) Your knees should be slightly under the keyboard and should not be touching any part of the piano. Never let the elbows touch the knees!
Lean forward a little as you play. Sit tall, while ensuring the back muscles are loose and relaxed.
Using the pedal
We will discuss the functions of the pedals later on in the course, but let’s take a moment now to take a look at pedaling posture. No doubt you’ve been tempted to push the sustain (right) pedal down and listen to the dramatic effect it has on the sound!
If you own a keyboard, you can purchase a sustain pedal that plugs into the back of the instrument. If using one of these, make sure it is placed directly beneath the keyboard in front of your right foot.
When pedaling, keep the heel on the floor so it acts as a hinge. Move the pedal up and down with the same action as tapping your foot along to a piece of music. Use the right foot to play the sustain pedal. In more advanced music, you’ll also use the left pedal to create bigger variations in volume. Same rules apply in terms of posture, just switch feet.
When not using the pedal, make sure the feet return to sitting flat on the floor.
Hand Shape
Developing a correct hand shape is possibly the most important element when starting out learning the piano.
As with the arms, it’s important to keep the muscles of your hands relaxed. Before we begin, take a moment to shake out the hands, making sure there is no tension in your wrists or fingers.
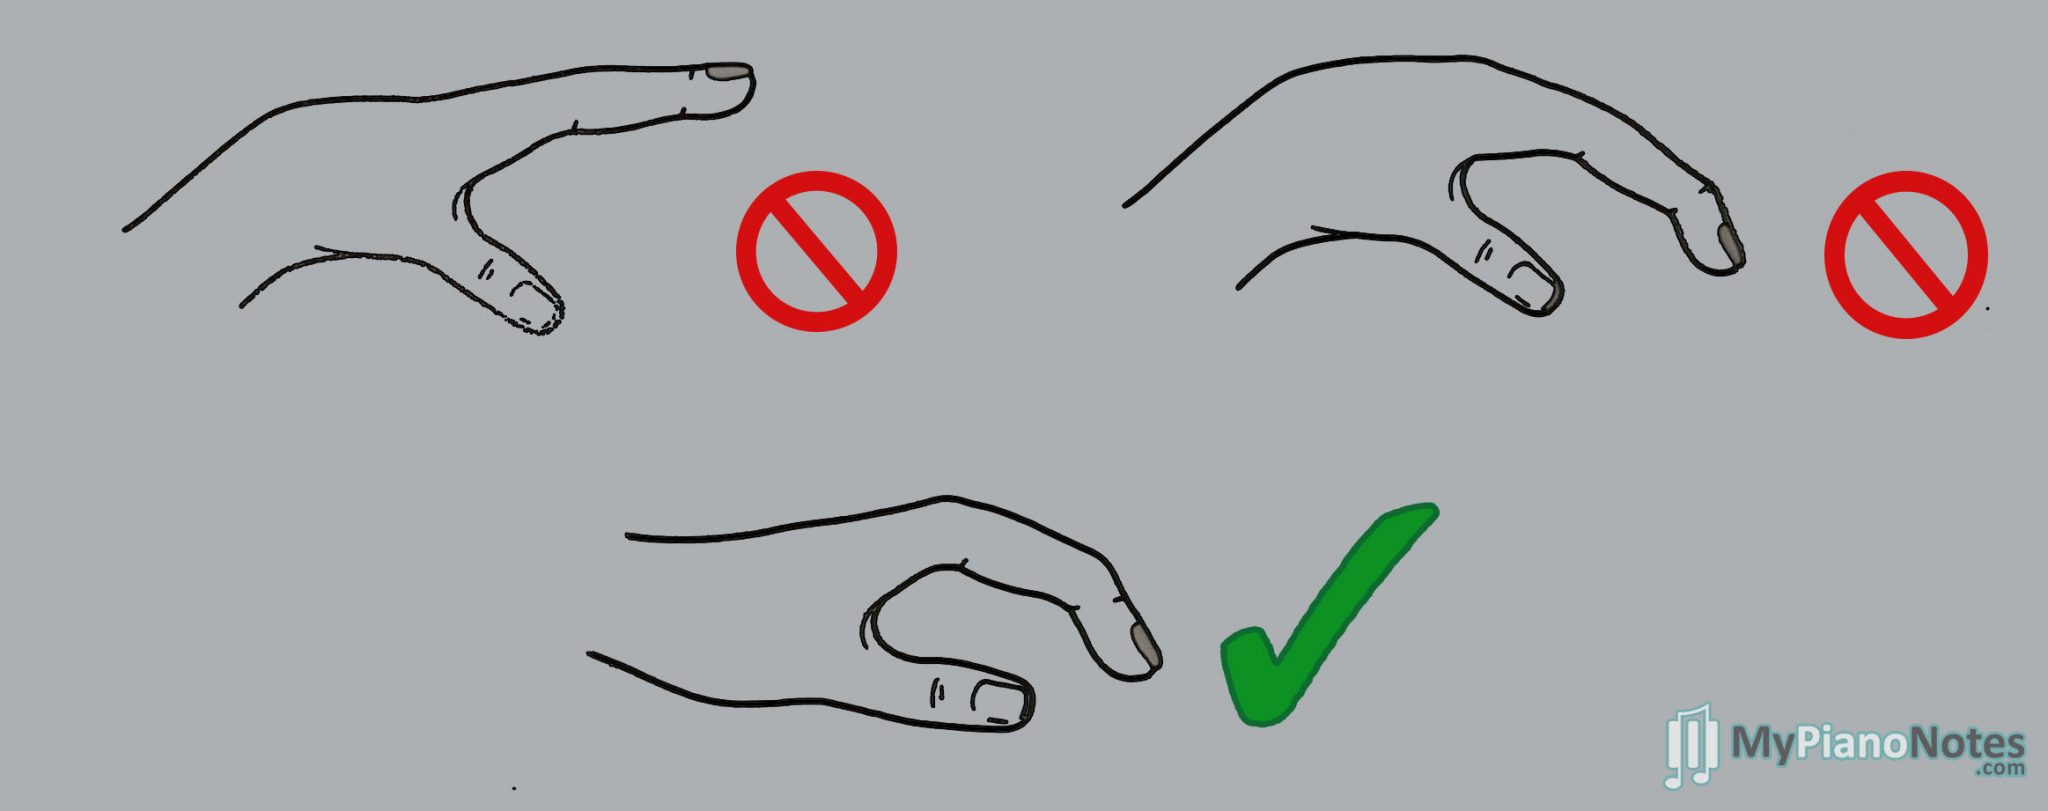
When playing the piano, we want to maintain a curved hand shape whenever possible. Here’s a great exercise to find the correct shape:
Place your hands over your kneecaps. Let the fingers curve loosely around the knee. Notice their rounded shape. Now, lift the hands away from the knees and bring them to the keyboard, maintaining the same curve.
Use the tips of the fingers— not the finger pads— to push the keys. You should play with the side of the thumb however, not the tip.
The Bubble Technique
Another great way to find the correct hand shape— and a method that works particularly well with young children— is to hold the hands upwards with the palms flat. Now, imagine placing a bubble the size of an orange in each of the palms. What kind of shape would you need to make to ensure the bubble doesn’t float away? Remember to keep the hands soft – otherwise the bubble will pop!
Wrists and forearms
You’ll notice in the above diagrams that the wrists and forearms are flat. Be careful not to drop the wrists. Aim to maintain a straight line between the wrists and elbows. A great way to check this is to balance a ruler on the forearm. Can you move your fingers without it falling off?! Keep the elbows slightly away from the body.
Why is this important?
So, we’ve spoken in detail about getting the hand shape and posture right. But why is it so important?
Playing on the tips of the fingers allows much greater control compared to playing with the finger pads. You will be able to play with much more accurate dynamics (louds and softs) and a more controlled, musical tone. You’ll also have greater accuracy of notes!
If you’ve ever seen someone play a piano scale— or played one yourself— you’ll know that piano playing involves a lot of crossing the fingers over and under each other. Try doing this with flat hands. Impossible, right?
Finally, playing in this shape allows the fingers to move much more quickly. And we all want to be able to play faster, don’t we?!
Perfecting the hand shape and posture
Keeping a curved hand shape when playing the piano is not easy! Many beginners find their hands flattening, the moment they stop thinking about the curved position! Take a moment at the start of each piece to ensure your hands are beginning in the correct position. And the end of the piece, check back. Are your hands still rounded? Or have the fingers slipped into a flattened shape? If so, don’t worry. Just bring the hands back to the rounded shape. This trains the muscles in the hand to behave in a particular manner.
Take a moment to check whether your hands are still relaxed. Particularly while developing this position, it is easy to carry tension in the fingers and wrists. If you notice this happening, shake out the hands to relax them.
Like anything in life, playing with the correct hand shape and posture becomes easier with practice. Spend time developing these elements and before you know it, they will become natural!
Part 4: How to Read Piano Music?
Let’s take a look at the basics of note reading. While it is, of course, possible to play the piano by ear, the ability to read music will open up your options to play amazing pieces you may never have heard!
Learning to read music may seem daunting, but it doesn’t have to be. Spend a little time learning the principles behind note reading and you’ll soon start to see the order behind those squiggles of black dots! Be patient. After all, you’re learning a new language. And you wouldn’t expect to be fluent in a new language overnight, right?
The Musical Alphabets
In Western music, all instruments (with the exception of unpitched percussion such as drums) use the same musical alphabet, consisting of seven notes; A, B, C, D, E, F, and G.
Use this the link below to learn more about the musical alphabet and locate each of these notes on your instrument.
Before progressing to note-reading, make sure you can confidently name each note on your piano. A great exercise for this is to close your eyes and play a random key. Open your eyes and see if you can name the note.
Sheet Music
To understand the principles behind note reading, check out our sheet music guide. Here, you will learn the positions of the notes in both the treble clef and bass clef, along with other important principles like time signatures, note values and key signatures.
Learn to Read Piano Sheet Music
Also, our sheet music guide contains some exercises to help you become a master at reading piano sheet music.
Part 5: Fundamentals of Piano Music
As you probably know, the piano is an extremely versatile instrument— perhaps this is what attracted you to it in the first place!
The piano— and its close relative, the electric keyboard— works equally well as both a solo and ensemble instrument and is used across countless musical genres including classical, jazz, rock and pop.
Because of its versatility, the way the piano is played can vary greatly. You’ll find piano pieces in which both hands play melodies, pieces in which one hand plays the melody and another plays chords and pieces in which the piano is required merely as an accompaniment to a singer, instrumentalist or entire band.
To further understand these different ways of playing, let’s look closer at what melody and accompaniment really mean.
Melody refers to the tune of a piece. Most often, this is the part of the song that makes it recognizable; the part you can sing along to. Because of the way the piano is built, we most often play the melody in the right hand of a piano solo. (Our ears naturally hear higher sounds as the louder ones, so by playing the melody with the higher right-hand notes, it stands out more clearly above the left-hand accompaniment.)
So what do we mean when we talk about accompaniment? The accompaniment is the part of the music that supports the melody. You will often hear accompaniment referred to as harmony— that is, more than one note played at time.
We will shortly take an in-depth look at harmony, but to do so, it is important to have a basic understanding of scales.
So before we go any further, go ahead and check out our guide below to get in in-depth understanding of Piano Scales.
Beginner’s Guide to Piano Scales
Okay, got all that?! While of course, you don’t need to have memorized every single scale to be able to move ahead, having a basic understanding of what scales are will greatly help you understand chords and harmony. So, once you think you’ve got it, it’s time to move on to the piano chords guide.
Beginner’s Guide to Piano Chords
Assuming that you went to the above articles, and are familiar with Piano Scales and Chords both. It’s time to start practicing and learn piano more effectively.
Part 6: Practice Program & Exercises to Learn Piano more Effectively
So hopefully by now, you have an understanding of the basic concepts behind piano playing. Of course, note reading and identifying the keys are things that take time to master. Go back over this guide as often as you need to until you feel as though you’ve really grasped the basics.
For now, let’s go ahead and put these concepts into practice. We’ll be looking at some technical exercises, focusing on fingering, technique, note-reading and rhythm as well as some basic pieces you can use to get started.
Fingering Exercises
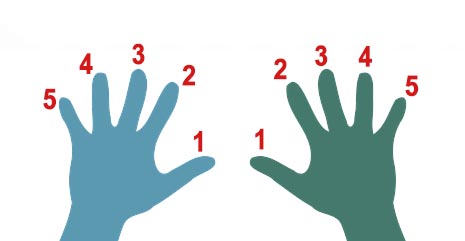
As we learned in the scale module, each finger in piano is given a number. This is used to specify which finger to play each note with. Let’s revise. Remember the thumb of each hand is number one, moving outwards to the little finger, which is finger number five.
Exercise 1.
To help memorize these finger numbers, practice calling out a number and moving the corresponding finger. Are you moving that finger on its own or are other fingers moving at the same time? As well as helping with finger numbers, this is also a great exercise to develop independent movement of the fingers.
Exercise 2.
Like exercise one, this exercise can be practiced away from the piano. Make a curved hand shape (as we discussed in our hand position and posture section)— you can do this on a table top, or your lap. For each of the patterns below, see if you can ‘play’ with the corresponding fingers. Use the same movement as though you were playing a note on the piano. Try each pattern with your left hand, right hand and then hands together:
- 1 2 3
- 1 3 5
- 4 2 2
- 1 5 4
- 1 3 2 5
- 2 5 3 4
- 2 3 1 5
- 1 2 3 5 4
- 4 2 4 5 1
- 3 1 3 5 2
Got these? Now try making up some patterns of your own.
The next step, of course, is to take these exercises to the piano! Practice starting with your thumbs on different notes, finding each five-finger position carefully. You should have one finger on each note, not skipping any keys. For example, if your right-hand thumb is on A, your fingers should be resting on A, B, C, D, and E. If your left-hand thumb is on A, your fingers will be on A, G, F, E and D.
Technical Exercises at the Piano
By now, you’ve probably been through our scale guide. Scales are one of the best ways to improve technique, but there are plenty of other great technical exercises you can do to improve finger dexterity, tone, control and hand shape.
Simple exercises such as walking through each note of the five-finger position can be incredibly valuable when starting out— and a great place to begin before attempting to play scales, with the difficult finger crosses and thumb passing. Practice playing each note staccato (short and detached) and legato (smoothly). Ensure each note is clear and controlled. Try playing one hand at a time, moving on to hands together as you gain confidence.
Once you’ve mastered this exercise, try playing the notes by skip. Here’s an easy exercise to help develop control of the fingers. Practice each hand separately before trying hands together. Make sure you are playing each note with the correct finger. And be careful to watch the skips and steps!
For a wealth of fantastic technical exercises for beginners, check out the Dozen a Day series by Edna Mae Burnham. Great for both kids and adults, it will take you from the simplest stepping exercises to more advanced techniques such as finger crossing, ornamentation and hand position changes.
Over the centuries, there have been countless great piano teachers who have composed their own collections of piano exercises and studies. Arguably the greatest of these was the Austrian composer and pianist, Carl Czerny. Creator of over a thousand pieces written to improve piano technique, his work is still widely used among teachers today. A great place to begin exploring his work is his Practical Exercises for Beginners.
Scale-Based Exercises
We have already explored the basics of scale playing in our piano scales guide, but let’s take a look at further exercises you can incorporate into your practice program to help improve technique.
Arpeggios
Arpeggios are patterns formed around the first, third and fifth notes of a scale. (If you’ve read our chord guide, you’ll remember these are the same notes that make up a triad.) Playing arpeggios are a great way to perfect skipping notes on the piano, thumb crosses and hand position changes.
Let’s start with a simple arpeggio pattern. We’ll use the key of C Major.
Here’s the scale:
C D E F G A B C
To form the arpeggio, we will take notes one, three and five from the scale, as well as adding the high C on top:
C E G C
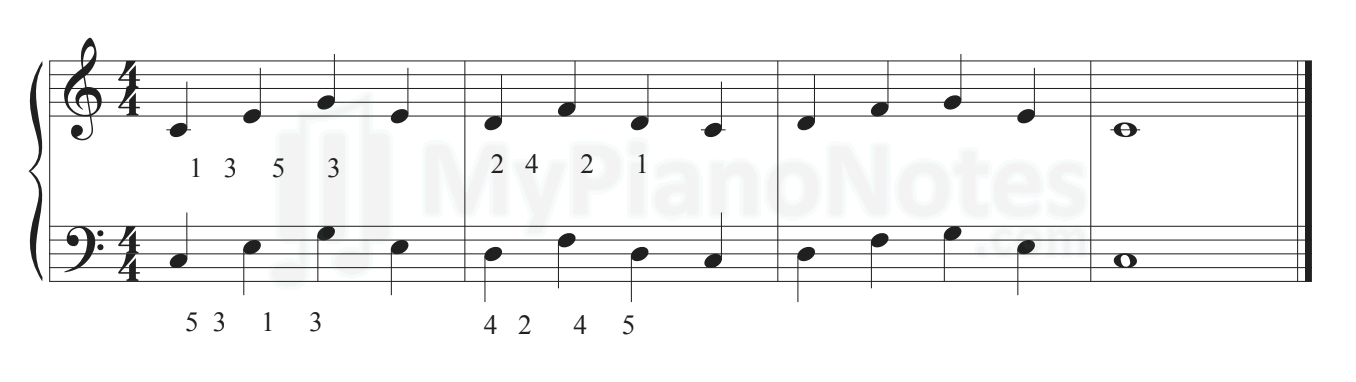
Take close note of the right hand fingering:
C E G C
1 2 3 5
Note that we use the second finger on E, stretching the third finger to C before the fifth finger reaches the top C.
In the left hand, this fingering is reversed:
C E G C
5 4 or 3 2 1
Experiment playing E with both your fourth and third finger, choosing whichever is the most comfortable for you.
Here it is written on the stave:
Practice with hands separately, being careful not to strike any additional notes. Then try together.
Once you’ve mastered this short arpeggio, try playing two octaves.
Of course, you can also try playing arpeggios in any key. Simply find take the first, third and fifth notes of the scale and add the upper home note (the last note of the scale).
Contrary Motion Scales
Once you’ve mastered regular scales, try playing them contrary motion. Contrary motion means ‘opposite direction’— when one hand plays an ascending scale, the other hand plays a descending scale. Let’s try it with C Major.
Begin with your thumbs sharing Middle C. Your right hand is going to play an ascending scale and your left hand will play descending. When you play scales this way, the two hands will play with the same fingers at the same time. The notes, however, will be different. (Note: this is the case for scales with the simplest fingering- C Major Scale, G Major Scale, D Major, A Major, E major, A minor, D Minor, G Minor, E Minor, C Minor. With more complex scales, the fingering will be different in each hand.)
Try playing one octave on C Major. Say in your head ‘finger one, two, three, thumbs under’ to make sure you remember to pass the thumbs underneath. Once you have crossed the thumbs, continue playing the scale outwards until you reach the top of the scale in the right hand and the bottom of the scale in the left hand. Then turn around and return to Middle C, remembering to cross the third finger over in each hand after you play your thumbs.
Once you’ve mastered the C Major scale, try some other keys. Begin with the simple fingering scales mentioned above.
Note-reading exercises
We have already looked at a few note-reading exercises in our note reading guide (insert link), but it’s a great idea to incorporate sight-reading exercises into your practice program to build your skills. With regular practice, you’ll find reading the notes becomes fluent, just like reading words!
A few suggestions are Paul Harris’s Improve Your Sight-reading series, sight-reading books from the Piano Adventures series or Rebecca Stewart’s Sight-reading Secrets.
When sight-reading, make sure you are paying attention to both the rhythm and the pitch of the notes. Refer to our note reading guide to revise values and names of each type of note.
Playing with A Metronome
Playing with a metronome is a great way to ensure you are playing in time. A metronome is a device that clicks out the beat and can be programmed to different speeds. You might have seen acoustic metronomes like this one:
If you have an electric keyboard you probably have a metronome built in to your instrument.
To begin working with the metronome, set the tempo to 60 beats per minute. This means the metronome will tick sixty times per minute—once every second. Try clapping along with the rhythm. Once this is easy, play a simple rhythm on the piano, using Middle C. Listen carefully, ensuring you are playing each note right on the click of the metronome.

When this is easy, try the next rhythm. Make sure the first note of each bar is held for two beats. (The metronome should click twice for this note.)

Here are a few more rhythms you can try playing with the metronome:


Once you’ve mastered playing these in time using Middle C, trying playing using different notes. It doesn’t matter which ones— the idea is to practice keeping in time which changing fingers on the piano. This is also a great exercise in improvisation
You can also try playing the above exercises with the metronome at faster and slower speeds.
Chord Exercises
We have talked a lot about the structure of chords in our Chord Guide. Go ahead and revise this section before continuing.
In this exercise we will look at some practical ways we will use chords when playing the piano. After all, chord playing makes up a huge part of piano repertoire!
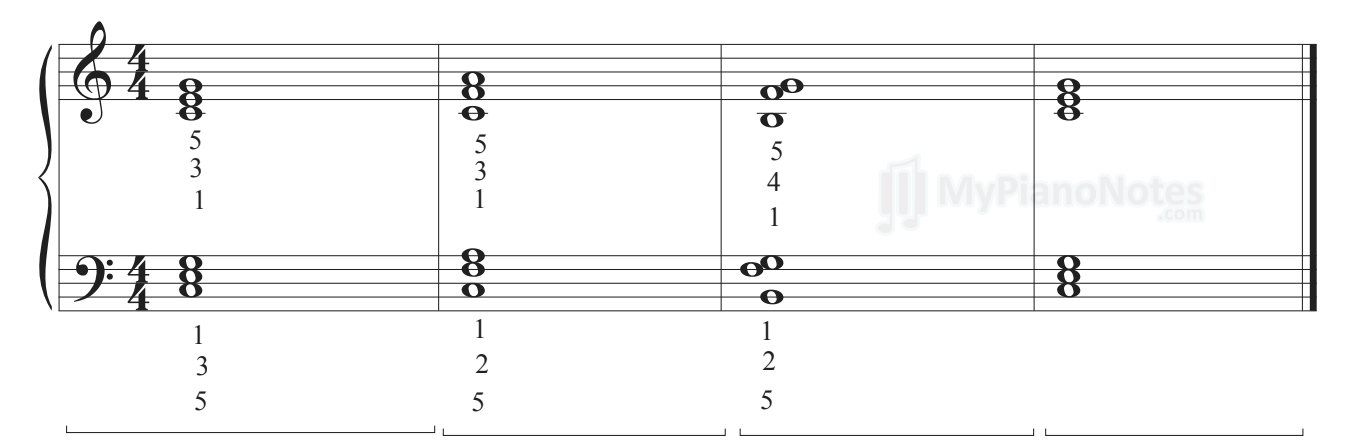
We will start by playing the C, F and G Major triads. We are going to play them in root position— this means the home note of the chord is on the bottom. Try with both your left and right hands. Play slowly and carefully!
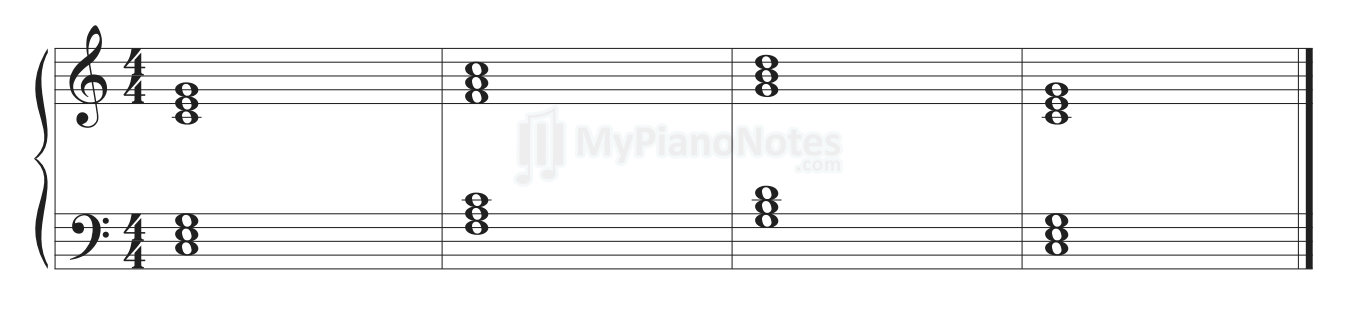
You’ll notice that these chords sound good together, but it is quite awkward moving from one chord to the other. There is a lot of jumping around the piano! To make this chord progression easier to play, we are going to rearrange the notes of some of the chords.
Take a look at the exercise below.
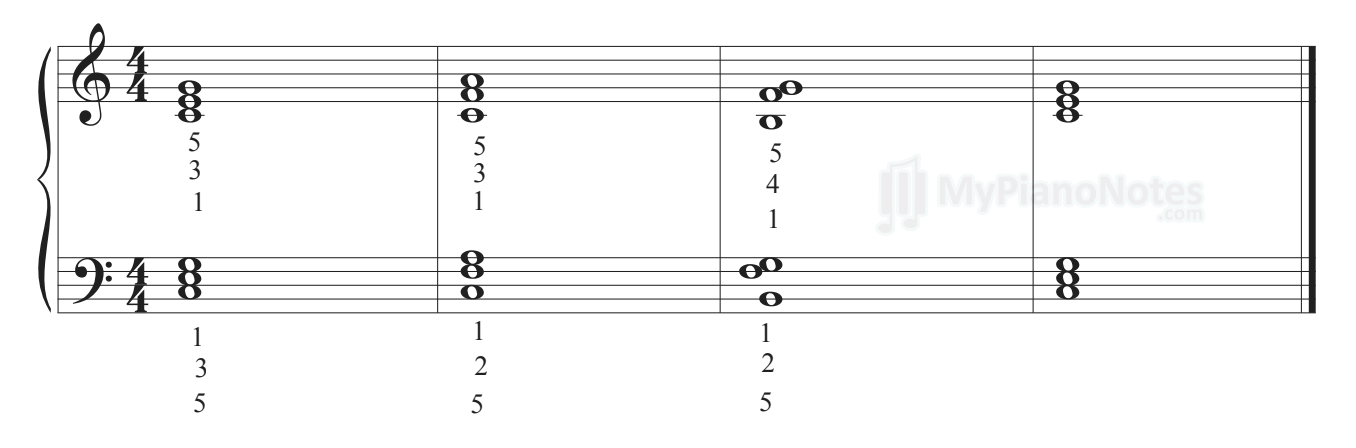
The first chord, C Major Chord, is played the same way as in the first exercise, but the second and third chords have changed.
Let’s look at the second chord. The notes of the chord are C, F, and A. These are the same notes we played in the F major root position chord— we have just rearranged them. We call this playing in inversion. Try playing the first two chords of the exercise again. Take careful note of the fingering beneath the chords. It’s much easier to play now, right? Let’s move on to the third chord.
Again, we have rearranged the notes of the G Major chord to make it easier to reach. If your note-reading skills are good, however, you’ll see another different. Instead of using the notes G, B and D to make up the chord, we are using B, F and G. By substituting the D for and F, it creates a G7 chord (See our guide for piano chords for more details) and creates a stronger pull back to the home chord, which in this exercise, is C Major.
The Twelve Bar Blues
Whether you’re aware of it or not, you’ve probably already heard the twelve-bar blues chord progression! This is a very simple pattern of chords that forms the basis of countless famous jazz, blues, pop and rock songs including Elvis Presley’s Hound Dog, Rock Around the Clock by Bill Haley and the Comets and Buddy Guy’s Mustang Sally.
If you can play the chord exercises we just looked at, you can play the twelve-bar blues!
Here is the pattern of the twelve-bar blues in the key of C Major. Each chord will be held for one bar.
C/ C/ C/ C
F/ F/ C/ C/
G/ F/ C/ C
Have fun finding these chords in both the left and right hands.
Pedaling Exercises
We have touched on pedaling briefly, but let’s look at a few exercises to help you master the pedal.
We’ll begin by revising the basics.
If you are playing a piano, you will have either two or three pedals, depending on the model and type of your instrument. For this exercise, we will be using the pedal on the right; the sustain pedal. If you are playing a keyboard, you can purchase a sustain pedal which plugs into the back of your instrument.
If you’re unsure what the pedal does, take a moment to play a few notes with the pedal held down. How does it affect the sound? Depressing the pedal makes the notes continue even after you have taken your hands from the keys. It creates a legato or connected effect. If you can, lift the lid of your piano and watch the action of playing the keys with and without the pedal. Watching what happens inside your piano can be great for understanding exactly what the pedal does to the notes.
The sustain pedal is often used to produce a legato sound when playing chords. So for our chord exercise, let’s go back to the chord progression we played in earlier.
Let’s try this again, this time using the sustain pedal to connect the notes.
We will use the right foot to play the sustain pedal. If you are using a detachable pedal that plugs into your keyboard, ensure it is sitting straight in front of your right foot. Make sure your heel is on the floor. Your foot should act like a hinge as you push the pedal up and down. Practice depressing and lifting the pedal a few times, ensuring you the pedal goes all the way to the top when you lift it
Here is the exercise again, this time with pedaling marked in.
The horizontal lines beneath the chords indicate that the pedal is to be depressed. The upwards marks at the end of the bar indicate to lift the pedal, then press it down again very quickly.
Try playing the exercise through, lifting your foot to change the pedal at the same time you lift your hand to play the chord. Do this a few times.
Now we are going to change things a little. This time, keep the pedal down as you lift your hands. The moment you press the keys of the next chord, lift and depress the pedal. You will hear this produces a much smoother and connected sound. Practice this very slowly and carefully.
Getting the correct timing of the pedal can be tricky, so be patient! The good news is, once you have mastered it, pedaling becomes very instinctive and second nature— so keep at it!
Part 7: A Three-Month Guide to Learn the Piano (Conclusion)
Ok, so we’ve covered a lot of material so far! Feeling overwhelmed?! There’s no need to be. The following guide is a great way to organize all the material we have covered so far into a manageable program of learning. Remember, the time frames suggested are just a guide— take the learning at your own pace and be patient with yourself! Above all, remember to have fun!
Week 1: Learning Notes and Finger Numbers
- Practice finding and naming the notes on the piano. See if you can correctly name each key by the end of the week.
- Memorize the finger numbers in each hand. Practice the fingering exercises from our Practice Program.
- Try improvising at the piano. Remember, it doesn’t matter how it sounds; the idea is to become familiar will the feel and geography of the instrument.
Week 2: Beginning Note-reading
- Memorize the five notes in C position in each hand. Where are they on the piano? What do they look like when they are written down? (C D E F and G) Try the ‘playing by step and skip’ exercises from our note-reading guide.
- See if you can play the first two songs in our Beginner Songs List.
- Practice the first technical exercise from our Practice Program, playing with hands separately.
Week 3: Beginning to play with hands together
- Practice the first technical exercise from our Practice Program, playing with hands together.
- Try song three from our Beginner Songs List.
Week 4: Learning the notes in G Position
- Make sure you can comfortably find the notes G, A, B, C, and D in each hand. Use the right-hand thumb to play G and the left-hand 5th finger. Use our note-reading guide to memorize where these notes live on the stave.
- Try the fingering exercises from our Practice Program using this new G Position.
- Try to first technical exercise from our Practice Program with your hands in G position. Practice hands separately
- Don’t forget to keep practicing the songs and exercises we have learnt so far!
Week 5: Playing hands together in G position
- Try the first technical exercise from our Practice Program in G position with the hands together.
- Try song four from our Beginner Songs List.
Week 6: Introduction to scales- C and G Major
- Try the scales of C and G Major, hands separately, one octave. If this is easy, try playing hands together in similar and contrary motion.
- Keep practicing the pieces and exercises from the previous weeks.
Week 7: Playing with Key Signatures
- Make sure you are familiar with the scale of G Major. If you haven’t already, try playing it hands together, similar and contrary motion. The more familiar you are with the scale, the easier the next piece will be.
- Try Song 5 from our Beginner Song List. Notice the sharp sign at the beginning of the piece. Remember, this denotes that every F in the piece should be played as a sharp!
Week 8: Introducing chords
- Read our Piano Chords Overview.
- Read our chapter on the Chords in C Major.
- Try the chord exercises in our Practice Program.
- Try the Twelve-Bar Blues from our Practice Program.
- If you feel you have mastered the C Major chords, try some chords in other keys from our chords tutorials.
Week 9: Minor Keys
- Try playing the scale of A minor. Start with hands separately, extending to hands together, similar and contrary motion once you are confident. Begin with A the scale of A Natural Minor, then try the harmonic and melodic forms
- Try the chords from the key of A Minor.
- Try playing the Twelve-Bar Blues in the key of A Minor. Here is the pattern:
Am/Am/Am/Am
Dm/Dm/Am/Am
E/Dm/Am/Am
Listen to how different this sounds to playing the pattern in the key of C Major!
Week 10: Using the Pedal
- Re-read the section on pedaling from our Hand Position and Posture guide.
- Try the pedaling exercises from our Practice Program.
- Don’t forget to keep practicing the pieces we have learnt so far!
Week 11: Changing Hand Positions
- Try playing the arpeggio of C Major and G Major.
- Practice jumping between C position and G position.
- Can you join together songs three and four from our Beginner Song List to make one long piece? See if you can change hand positions without losing any time!
Week 12: Putting it All Together.
Try Song Six from our Beginner Song List. This piece includes all the things we have discussed so far: key signatures, pedaling, dynamics, articulation and changing hand positions. Try it first playing hands separately and then try slowly hand together.
Congratulations on Making it till Week 12!
Part 7: References and Tips for Further Learning
There is a wealth of piano music available both on and offline. Here are some great places to look to help learn piano a little more:
Piano Course Books
- Piano Adventures Series – great for both children and adults from beginners to intermediate. Their course includes repertoire, theory, sight-reading and technique books.
- Alfred’s Basic Adult Piano Course – as the name suggests, designed for adults and older learners.
- Bastien Piano Basics – perfect for children, this series begins with extremely simple pieces and works its way up to late beginner works.
Technical Work Books
- A Dozen a Day Series – great for both children and adults from beginners to early intermediate.
- Works by Carl Czerny. As discussed earlier, Czerny’s works are perfect for developing piano technique. Begin with his Practical Method for Beginners Op.599.
- Hanon: The Virtuoso Pianist – similar to Czerny’s works, these exercises by Hanon are invaluable for anyone looking to build their technique as a pianist. While the written score can appear quite daunting, the exercises themselves begin quite simply and can be managed by late beginner/early intermediate students.
Music Theory
Anyone serious about learning to play the piano should invest some time in learning music theory. Understanding how music works helps with reading, playing, composition and improvising. Try the following books:
- Music Theory for Young Musicians – a great, easy-to-understand series for older children and teenagers.
- Music Theory in Practice – this series, aimed at adults and older children/teenagers followers the syllabuses of examination boards such as the ABRSM and AMEB. Each grade comes with a workbook and textbook.
Examinations:
If you’re serious about mastering the piano, taking exams can be a great way to focus your practice and gauge your progress. Exam requirements generally include scales, pieces, sight-reading and listening tests. Most countries have their own examination boards including the ABRSM in the UK, AMEB in Australia and USMCE in the United States